How to Add Data Analysis in Excel on Mac
Need to perform advanced statistical analyses but can’t find the Data Analysis ToolPak in Excel on your Mac? Don’t worry; here’s a straightforward guide on how to add Data Analysis in Excel on Mac quickly and easily.
Step 1: Open Excel and Check for the ToolPak
- Open Excel and create a new blank workbook.
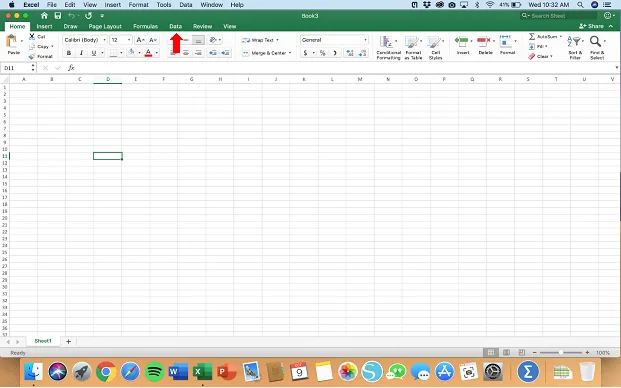
- Click on the Data tab in the top ribbon.
- Look for the “Data Analysis” button.
- If it’s there, the ToolPak is already added.
- If not, proceed to learn how to add Data Analysis in Excel on Mac.
For additional details, you can refer to Microsoft Support, which provides step-by-step instructions.
Step 2: Access the Excel Add-Ins
- At the top menu bar, click on “Tools”.
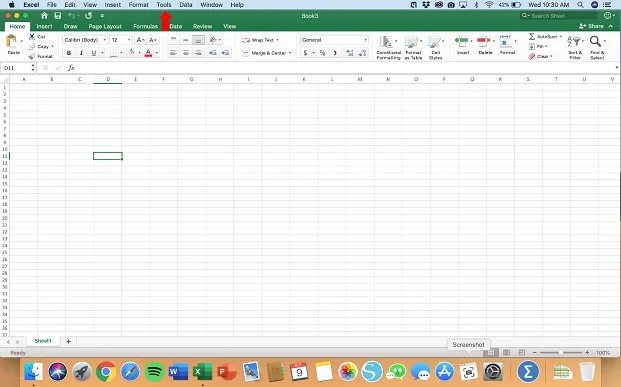
- Select “Excel Add-ins…” from the dropdown.
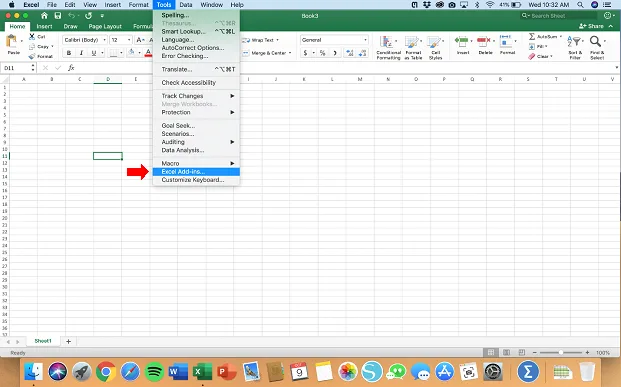
- This is where you begin adding the Data Analysis in Excel on Mac.
For further clarification on where to find the Tools menu on Mac, see this discussion on the Microsoft Tech Community.
Step 3: Enable the Analysis ToolPak
- In the Excel Add-Ins dialog box, find “Analysis ToolPak”.
- Check the box next to it.
- If you don’t see it, click “Browse…” to locate it.
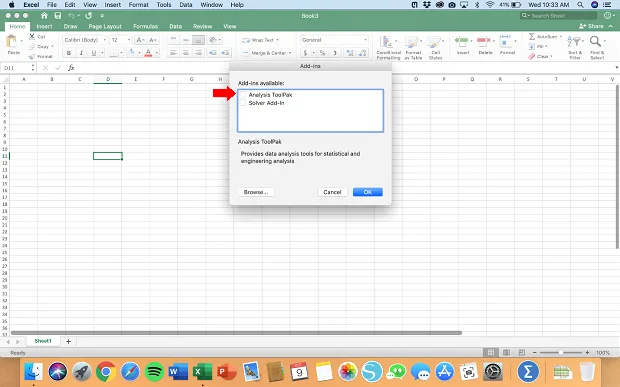
- Click “OK” to confirm.
- You’ve now completed a key step in how to add Data Analysis in Excel on Mac.
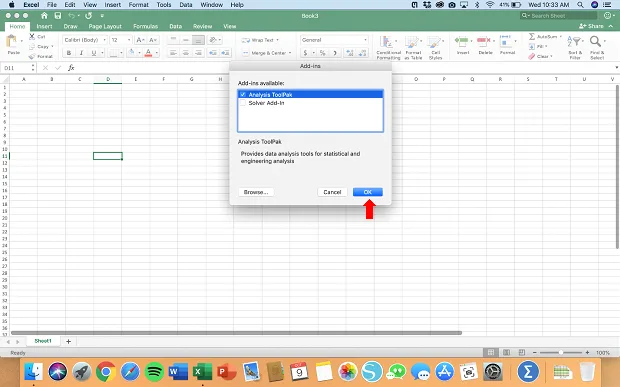
You may need to download the ToolPak from Microsoft’s website if it isn’t listed. Alternatively, the Microsoft Tech Community provides information on using the ToolPak with VBA on Mac.
Step 4: Restart Excel (If Prompted)
- If prompted to install the ToolPak, click “Yes”.
- Restart Excel to finalize the installation.
Step 5: Verify the ToolPak Is Added
- Reopen Excel and go to the Data tab.
- The “Data Analysis” button should now be visible.
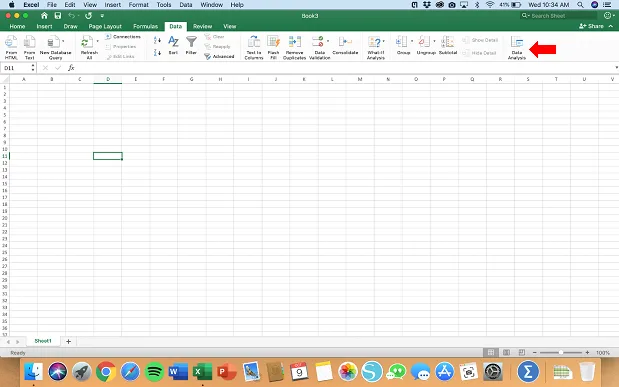
- Congratulations! You’ve learned how to add Data Analysis in Excel on Mac.
For additional help, check out Quora’s guide on activating the Analysis ToolPak.
How to Use the Data Analysis ToolPak
- Click on “Data Analysis” in the Data tab.
- Select the analysis tool you need (e.g., Regression, ANOVA).
- Input your data ranges and parameters.
- Click “OK” to run the analysis.
- Now that you know how to add Data Analysis in Excel, you can perform advanced analyses.
Troubleshooting Tips
- Data Analysis not showing in Excel 365:
- Ensure the ToolPak is enabled in the Add-Ins.
- Update Excel to the latest version.
- Add-Ins on Mac Excel:
- Access via Tools > Excel Add-ins….
- Tools Menu in Excel Mac:
- Found at the top menu bar when Excel is active.
Additional Resources
- Data Management: Learn about the 8 Top Master Data Management Tools in 2024 to organize your data efficiently.
- AI Tools: Discover the 8 Best AI Tools for Small Businesses to automate your analytics.
- SQL Usage: Improve your skills with SQL for Data Analysis | How to Best Use SQL in Data Analysis.
FAQs
Q: Where is the Tools menu in Excel Mac?
A: It’s in the top menu bar when Excel is active.
Q: What if I can’t find the Analysis ToolPak?
A: Click “Browse…” in the Add-Ins dialog or download it from Microsoft’s website.
Q: Can I use other analysis tools in Excel Mac?
A: Yes, you can use built-in functions, PivotTables, or third-party add-ins.
Q: How do I write data analysis reports effectively?
A: Refer to our No. 1 Guide on How to Write Data Analysis Reports for expert tips.
Q: Do I need administrative rights to add the Data Analysis ToolPak in Excel on Mac?
A: No, you can enable it yourself without admin privileges via the Excel Add-Ins menu.
By following this concise guide on how to add Data Analysis in Excel, you can unlock powerful data analysis features in Excel on your Mac.
Credits for the Visuals: https://mattchoward.com/activating-data-analysis-in-excel-for-mac/
